


i'm a pretty lazy crafter.
i get lots of fun ideas but then never finish them.
or i get overwhelmed with tutorials & think,
"yeah right. i could never do that. i'm not as talented."
so when i finally followed through with an idea, it was a pretty momentous day in our house.
even Adam couldn't help but show his surprise that i finished something AND it looked good!
even Adam couldn't help but show his surprise that i finished something AND it looked good!
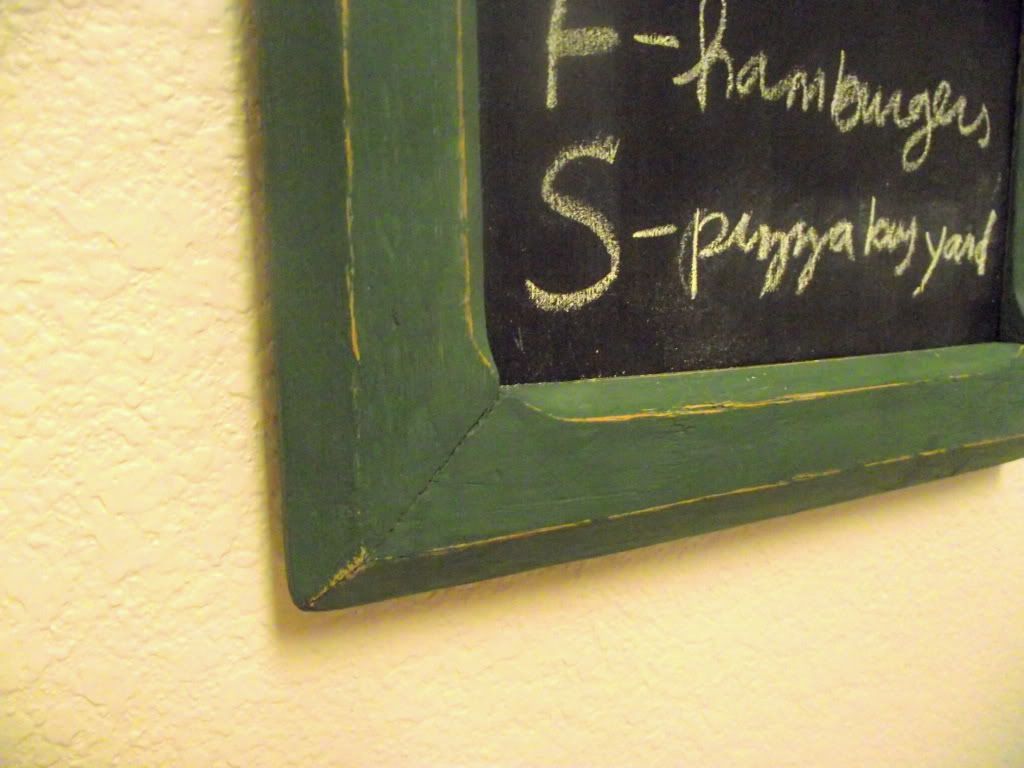
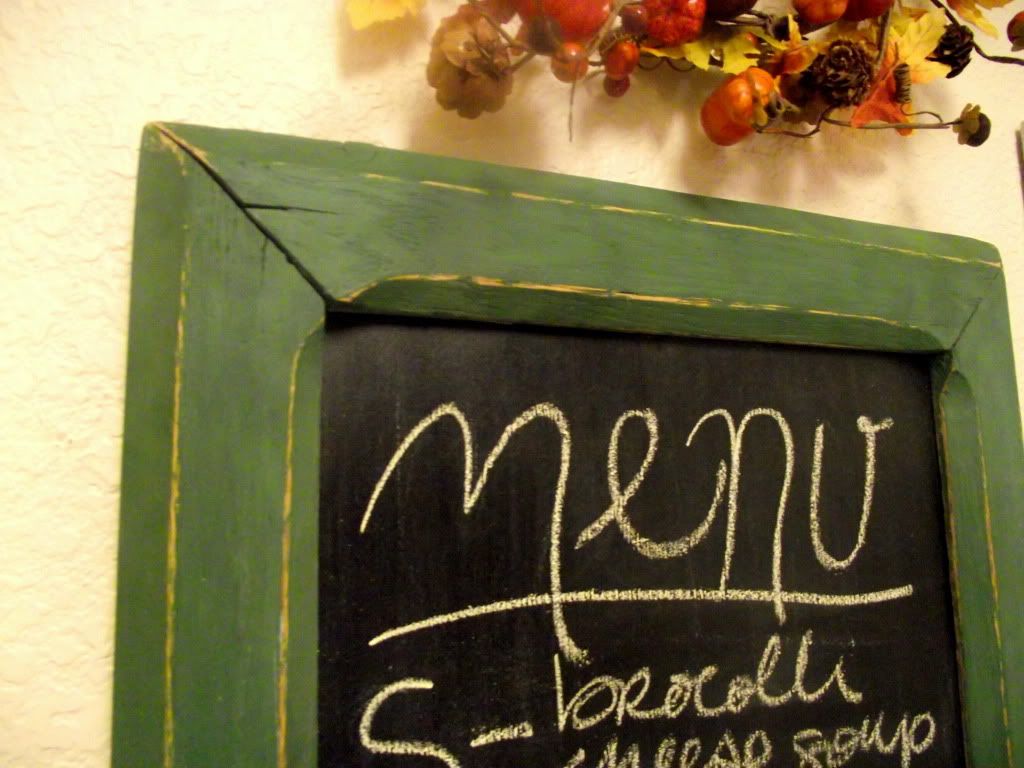
it's one of my favorite little happy spaces in our home now.
before i made this frame into a chalkboard it was SUPER beat up!
i found it in my grandma's garage when i was helping my grandparents move.
the frame was falling apart with paint peeling and was cracked along the back and sides [well it still is if you look close], the hanging wire it had was so old and rusted it broke off, and there was a really thick cracked mirror inside of the frame.
seriously it was really falling apart.
 |
| i forgot to take a "before" picture before i took it apart but this kind of gives you an idea of what it looked like |
but when i saw it i knew that it had good bones to make a chalkboard out of even though i wasn't sure exactly how i was going to do it.
once i began working on it, i realized it was pretty simple & after i was done i was kicking myself that i didn't finish it sooner. {i was scared of the chalkboard paint honestly!}

here's how i did it.
you need:
+ frame
+ plyboard for the chalkboard
+ sand paper
+ chalkboard paint
+ paint for your frame {unless it's already painted the color you want}
+ paintbrush
+ paintbrush
+ wall hanging hardware
i first sanded down every part of the frame, including the back and inside.
 |
| obviously not all of the supplies but wanted to show you what kind of chalkboard paint i used. |
it was so split and weathered it needed to be evened out and smoothed down.
next, i painted the frame the color i wanted and let it dry.
once it dried, i added another coat [or two] to make sure it was covered well and uniform. like i said, the wood was really beat up before so i needed an extra coat to have the color look even and get it in those rough areas.
once it dried, i added another coat [or two] to make sure it was covered well and uniform. like i said, the wood was really beat up before so i needed an extra coat to have the color look even and get it in those rough areas.
once the frame was painted to my liking and dried, i sanded around the corners, & edges to give it that rustic look.


now that part of the frame is done, so on to the chalkboard.
like i mentioned before, this used to be a frame for a really thick mirror.
so whatever i got to put in the frame again couldn't be too thin or flimsy or else it wouldn't fit snugly. that was probably the hardest part of the project, trying to find the right piece of wood for the chalkboard.
so whatever i got to put in the frame again couldn't be too thin or flimsy or else it wouldn't fit snugly. that was probably the hardest part of the project, trying to find the right piece of wood for the chalkboard.
enter: the nice people of Home Depot!
i took the broken mirror and frame into Home Depot to find a board that would fit inside and the guy was really really nice. he measured how thick the mirror was so we could find the right board to fit. the only boards there though are pretty big, and we don't have any kind of wood cutting tools.
but because Home Depot is awesome, the worker also cut out the board to fit for me FOR FREE!! since that was basically half my project, i was really really thankful for him taking the time to do that.
[edited to add: i didn't know they usually cut board for free that's why i was so excited, i never had to ask before. plus he took out the old, rusty screws, told me the best way to put it all back together since it was so old, and measured everything for me when he cut it so i was just really impressed that he took so much effort to help me out. and now i know that they usually do that for free so that makes me even more grateful :)]
moral of that story: don't be afraid to ask the workers to help you out!
since the board was all cut out and ready for me, all i had to do was paint it with chalkboard paint. be sure to follow the directions on the container.
after the chalkboard paint was dried and primed, i put it into the frame & screwed the back on again. the back is literally in two pieces because it had been sitting in the garage for so long.
but i was too cheap to get a new back and it still holds the chalkboard in so i don't mind.
but i was too cheap to get a new back and it still holds the chalkboard in so i don't mind.
to finish up, i added some wall hanging hardware to the back and hung it in our kitchen,
right next to my DIY metallic "EAT" letters
[paper mache letters from Joanns and metallic craft paint. boom. done. except, if it bubbles while you're painting it won't dry that way so just a warning :)]
[paper mache letters from Joanns and metallic craft paint. boom. done. except, if it bubbles while you're painting it won't dry that way so just a warning :)]

i'm so proud of all the elbow grease that i put into my chalkboard.
i know it is something i will enjoy for a long time & really helps to make our little apartment our home!
i know it is something i will enjoy for a long time & really helps to make our little apartment our home!
10 comments:
That looks so cute! You did a great job :) And I love that you distressed it a little too. Gives it a nice little touch. Good work!
soo cute!!!
This is super duper cute!! Go you!! :)
Love it! And now that you have chalkboard paint--so many more possibilities!! I can't wait to have my own house and paint a chalkboard wall for my kiddies in their playroom.
this turned out so freaking awesome! love it!
K
I love it Megan! So very cute.
I like it! And need to make myself one of these chalkboards for my kitchen.
Your home depot experience made me laugh. They do so many cuts for free. Good job finishing. I have the same problem with getting frustrated or just never finishing. It's nice o finish and have something that is cute in the end.
I am CRAZY impressed with you right now!! A fun recipe AND a craft all in one week! You're on a roll Megan!!!
That is just adorable! I love the aged look of the chalkboard/frame next to the modern shine of the letters. Perfect!
Post a Comment