Showing posts with label recipes. Show all posts

Easy {gluten-free} Pad Thai

Adam went on a gluten-free kick for a couple of weeks to test out some stomach stuff. 
So that was fun.... 

But while we were dealing with that I found some great recipes I want to share. 
One of them was this delicious pad thai recipe that I got from my friend. 
Seriously so easy, so fast, and yummy! 


Ingredients: 
-8 ounces dried, wide and flat rice noodles 
-2 tablespoons brown sugar 
-2 tablespoons fresh lime juice, plus wedges for serving 
-3 tablespoons of La Choy soy sauce (only gluten free brand) 
-1 squirt (about 1/8 teaspoon) Tapatio or Sriacha sauce (optional)
-2 teaspoons vegetable oil 
-3 scallions (green onions), white & green parts, separated and thinly sliced 
-1 clove minced garlic
-2 large eggs, lightly beaten (optional) 
-1/2 cup fresh cilantro 
-1/4 cup chopped roasted, salted peanuts 

Directions: 
1. Soak noodles according to package directions. (make sure you time it so they don't get mushy!) Drain. 
2. In a small bowl, whisk together brown sugar, lime juice, soy sauce, and Tapatio 
3. In a large nonstick skillet, heat oil over medium-high heat 
4. Add scallion whites and garlic and cook, stirring constantly, until fragrant (about 30 seconds). Add eggs and cooks, scraping skillet with spatula until eggs are almost set (about 30 seconds). Transfer eggs to plate. 
5. Add noodles, scallion greens, and sauce to skillet. Cook, tossing constantly, until noodles are soft (about 1 minute). Add egg mixture and toss to coat, breaking eggs up gently. 
6. Serve noodles with lime wedges, topped with cilantro and peanuts. 

variation: you can also add in a meat of your choice (chicken, shrimp, pork, beef) to the recipe. I used shrimp and cooked it in a separate pan then added it with the noodles & sauce, tossing it to coat it evenly. thumbs up!


ENJOY!

Costa Vida Sweet Pork Salad

I finally am getting around to sharing one of my favorite recipes. 
I have tried lots of different versions of this recipe over the last 3-4 years and I feel like I finally came up with the perfect one. 
At least the perfect one for my taste buds :) 
It's super easy and super delicious and I would seriously consider making this every day if I could. 
{Adam knows I would!} 

So here is my tried & true Costa Vida Sweet Pork copy-cat recipe. 


INGREDIENTS:
- 1-2 lbs of boneless pork ribs
- one can of Dr. Pepper (not diet!) 
- 2 cups of brown sugar 
- small can of diced green chilies 
- 1 can of green enchilada sauce (15 oz.)
- garlic powder
- onion powder 
- cumin

DIRECTIONS: 
- place pork ribs in crockpot 
- mix together Dr. Pepper, brown sugar, green chilies, enchilada sauce in a bowl 
- add garlic powder, onion powder, and cumin [I don't particularly measure, I just add it til I think it looks/tastes good] 
- pour sauce over ribs
- cook on HIGH for 4-5 hours or on LOW for 6-8 hours
- when pork is cooked, shred meat with forks. let simmer for about a half hour longer or until you have the rest of the toppings made. 

now to put it together! 

- warm up a flour tortilla on a skillet and add shredded cheese on top until melted 
- spoon sweet pork on top of tortilla with cheese, straining the liquid 
- top with cilantro lime rice [this is my favorite recipe!], 
  black or pinto beans [I like black, Adam likes pinto. we are a house divided ;)]
  romaine lettuce, 
  homemade pico de gallo,
  homemade cilantro ranch dressing, 
  and homemade fried corn chip strips. 

ENJOY!


Just looking at these pictures makes me want to cook this again tonight. 
It's so good!! 

If you make it, let me know how it turns out! :) 

Simple Homemade Baby Food {plus giveaway}


I've heard of all the great benefits of making your own baby food. 
It always sounded like a good idea when Elijah was a baby but with being exhausted with a kid who didn't sleep well, exhausted from school, and exhausted from post-partum emotions, making homemade baby food sounded like waaaaaaay too much work. 

So {gross} store-bought baby food it was. 
[the meat, you guys??? yikes!!

I was really excited when I was given the chance to review the Cuisinart Baby Food Maker

This machine is awesome!  
It steams, chops, and purees all the healthy ingredients to yummy baby food for your little one. And you can make large enough batches of vegetables, fruits, [and even much more delicious meats!] to be frozen and stored for future use. PLUS it also has a bottle warmer attached making it a perfect well-rounded gadget for all of baby's feeding needs. 

But what I love about this machine is what it can do besides just make baby food. 

Since we aren't in need of pureed fruits & vegetables just yet, it has been fun to test out the Cuisinart Baby Food Maker on simple recipes for our family. I've always wanted a food processor because it seems like everyone finds them handy. And this machine has some great tools that help it work just like that! I can chop ingredients easily or steam veggies not just for making baby food. 
Pretty handy! 

The Cuisinart Baby Food Maker comes with some healthy and delicious recipes for homemade baby food and even some that the whole family can enjoy.


{The Apple Pancakes are ones I can't wait to try out!}

You can find more great baby food ideas & healthy recipes at the Cuisinart Baby Recipe landing page

I'm really excited about my Baby Food Maker and can't wait to use it for all of Baby Girl's needs. 
I know it will help make our family healthier & happier all around. :)

--GIVEAWAY--

One lucky reader can win their very own Cuisinart Baby Food Maker! 
All you have to do is: 
1. visit the Cuisinart Baby Recipe page 
2. leave a comment telling me what you like most about the Cuisinart Baby Food Maker & a link to a recipe you'd like to try

Winner will be chosen on July 9th. 

-Good luck!-


{Thank you to Cuisinart for supporting this post & making organic, homemade baby food easier!}

Homemade Hostess Cupcakes


For Elijah's 4th birthday [back in April] he got to bring in treats for his preschool class to celebrate. 
He kept telling me how he wanting to bring cupcakes to share since all the other kids throughout the year had brought in cupcakes and then were sung Happy Birthday. 
E was seriously looking forward to his turn all year! 

So I decided I wanted to make his class cupcakes a little more special since
1. He was crazy excited about it 
2. It was his last birthday as an only child and I wanted to make it meaningful 
3. E is obsessssssssed with chocolate! 

I found this recipe a friend gave me for Homemade Hostess Cupcakes and had been looking for a good reason to make them for a long time. So I figured a little 4-year-old, chocolate-loving boy was a good of time as any :) 


Cupcake Ingredients: 
1 package Devil's Food Cake Mix 
2 tsp. hot water 
1/4 tsp. salt 
1 jar (7 ounces) marshmallow creme 
1/2 cup shortening 
1/3 cup powdered sugar
1/2 tsp. vanilla 

Ganache Ingredients: 
1 cup (6 ounces) semisweet chocolate chips 
3/4 cup heavy whipping cream 


Directions:  
1. Prepare and bake cake batter according to package directions for cupcakes. Cool completely. 

2. Combine water and salt until salt is dissolved. Cool. 

3. Beat the marshmallow creme, shortening, powdered sugar, and vanilla until light and fluffy. Add the salt mixture. 

4. Using pastry bag, push the tip through the bottom of the paper liner to fill each cupcake 
[I didn't have a pastry bag for this step so instead I cut a hole in the top of the cupcake with a little apple corer and then put the creme mix in a plastic bag, cut off a corner, and filled the cupcake with the creme mix. It worked pretty well! And you got lots of creme :)]

5. In a heavy saucepan, melt the chocolate chips with cream and stir until smooth. Cool slightly. 
[Definitely let it cool slightly or else it will be too runny. Also, when I make it again, I would make sure the cupcakes are even cooled in the fridge a little to make them more sturdy. It's probably cause I filled it with creme from the top but when I dipped the cupcakes in the ganache it was kind of crumby so I had to be careful. Just a tip!]

6. Dip the tops of the cupcakes in the ganache. Chill until set - about 20 minutes. Store in refrigerator. 

Makes 24 cupcakes. 

ENJOY! 

If you make these, I'd love to hear how they turned out and any tips you have! 

E-rock approved Carnation Fruit Smoothie

This shop is part of a social shopper marketing insight campaign with Pollinate Media Group® and Nestle, but all my opinions are my own. #pmedia  #BreakfastEssentials http://my-disclosur.es/OBsstV


Elijah is obsessed with having chocolate milk in the mornings. 
For.Reals. 
So much so that yesterday when we told him we ran out of chocolate syrup for chocolate milk, he cried for at least 30 minutes, begging me to go to the store at 7:00am to buy more right away. 

Obsessed

I usually let him have one cup along with something else for breakfast but have really been concerned about his daily consumption of it because it's obviously not the healthiest of breakfast foods. 
So when I had the opportunity to try out some Carnation Breakfast Essentials powdered drink mixes from Walmart, I was pretty excited to start a more healthy alternative to his non-nutritious-high-in-sugar morning drink routine. 

And he loved it! And I loved it too because I felt like he was getting something healthier than he was getting before. It was a win-win. 

But then we decided to step it up a notch! 
To curb his chocolate milk cravings even more, we used Carnation Breakfast Essentials in french vanilla flavor to make a delicious fruit smoothie. And Elijah LOVED it! He drank a whole huge cup by himself {even though he promised he would share with me... ;)}

So I wanted to share the E-rock award-winning thumbs-up smoothie recipe for you today so you too can impress your little picky eaters with a healthy and tasty breakfast treat!

Carnation Breakfast Essentials Fruit Smoothie


Ingredients:
-one packet of Classic French Vanilla Carnation Breakfast Essentials packet 
- 3/4 to 1 cup of milk 
- one cup of yogurt (we used strawberry yogurt) 
- a handful of your favorite frozen fruits (we used strawberries, raspberries, and blueberries because that what we had in our freezer)

Directions
- put frozen fruit, milk, Carnation vanilla packet, and yogurt in a blender 
- blend until smooth. 
-and ENJOY!


E-rock seriously thought it was the most amazing thing. 
He kept telling me how delicious it was over and over and would thank me for making such a yummy drink. "Smoovies are my favorite treat mom! I like the banilla one.


I'm excited to try more recipes and smoothie concoctions with the Carnation Breakfast Essentials packets. And Carnation has a great website full of tons more recipes to try out. So I know what we'll be doing this summer! 

And right now you can get a dollar off Carnation Breakfast Essentials at Walmart. Makes it an even better breakfast choice! And be sure to check out the Carnation Breakfast Essentials Facebook page for more breakfast ideas and recipes. 

Thumbs up for Carnation Breakfast Essentials!!


Bistro Pizza Date Night In

This post is part of a social shopper marketing insight campaign with Pollinate Media Group™ and Tony’s Pizza, but all my opinions are my own. #pmedia #tonyspizzeria http://my-disclosur.es/OBsstV


Going out on dates is kind of hard to come by these days. 
Money, crazy preschoolers, school, pregnancy exhaustion all play a part in the date night struggle. 

So after a particularly difficult & busy week with school and kid problems, 
[well who am I kidding? that's like every week for us.]
I decided to surprise Adam with a little in-home date night.  

And since pizza is pretty much one of the only indulgent food that this baby will let me have, we made it a fun pizza & movie date night with Tony's Pizza


Here's what you will need for easy Bistro style pizza: 

- Tony's Cheese Pizza 
[I bought mine at WalMart for a great price PLUS you can get a $.75 off coupon from Coupons.com on any two Tony's Pizzas while supplies last.]
- about 2 cups of baby leaf salad mix
- red onion cut into thing slices
- half a tomato 
-balsamic vinaigrette dressing (go light on it!)
- and I added some bacon bits (optional)

Steps: 
1. Cook the pizza according to directions on the box. 
2. Mix remaining ingredients in a bowl 
3. Top pizza with salad 

And enjoy! 


We loved this take on a simple cheese pizza to fancy it up for a date night in. And Tony's Pizza had the perfect taste and crispy crust to make it more enjoyable. For a budget friendly pizza, Tony's Pizza is definitely at the top of the list. We all loved it! 

[In fact, we fed Elijah some before bed and he ate 3 slices by himself. When he usually only eats maybe one and a half... maybe. So yeah, we really liked it. :)]


And of course date night isn't really date night without some sparkling cider, ice cream, and a good movie. Heavyweights ended up being our movie of choice because, I mean... it's Heavyweights!

You can also check out more deals & serving ideas for Tony's Pizza on their Twitter & Facebook page.

Happy date night-ing!!

Saucy & Cheesy {and easy!} Lasagna

This post is part of a social shopper marketing insight campaign with Pollinate Media Group™ and Barilla, but all my opinions are my own. #pmedia #JoytotheTable  http://cmp.ly/3/8vNxcO.


When Adam and I were first married, I was really excited to make homemade meals for my husband and put the cooking skills {I pretended to have} to work. After a few months though, I was getting kind of bored with my range of recipes. So I decided to give myself the challenge to cook through the Robinson Family Cookbook that Adam's aunts had put together. I didn't get all the way through every recipe, but I did find some great gems that I have now added to my meal rotation. 

One of the recipes I decided to try was Adam's aunt's lasagna recipe. The idea of making homemade lasagna totally freaked me out. For some reason I had this {kind of irrational} idea that lasagna from scratch takes forever and is really hard and it's hard to ever get right. Well, it wasn't hard and it didn't take that long but I did feel like I didn't get it exactly perfect to my tastes. 


So after a lot of tweaking and adjustments to previous lasagna recipes I've "researched," I think after 4.5 years of marriage I finally have come up with a recipe that I love and feel proud about sharing with others. And with the help of Barilla Lasagna Noodles and Barilla Sauce from Safeway, it made it even better. 

[Which, if you really know me, I get super nervous cooking for other people and self-conscious. So if I think it's good enough to share now, that means I really do think it's awesome :)]

One of my biggest problems with lots of lasagna recipes I tried before was that I felt like it was too dry. So that is why I call this... 

Mrs. Robinson's Saucy & Cheesy Lasagna

Here's what you'll need: 


Ingredients: 


*I do have to say that when I actually cook, I rarely measure out things exactly, unless it's baking or something. So, a lot of these measurements you can probably give or take for your own tastes and preferences. 

- 1 lb. ground beef or sausage [I used Italian sausage cause it's Adam's favorite :)]
- 1-2 jars of your favorite red pasta sauce. I used Roasted Garlic Barilla Sauce. 
- 1 package of Barilla Lasagna Noodles, uncooked 
- 1 tsp. minced garlic [give or take for your own tastes]
- 3 cups Cottage Cheese 
- 2 Eggs, beaten 
- 1/2 tsp. pepper
- Choice of seasoning. I used about 1-2 tsp. of parsley and 1-2 tsp. of Italian seasoning
- 1/2 cup Parmesan Cheese 
- 1 cup Mozarella Cheese


Directions: 


1. Brown the meat and saute briefly with minced garlic. Don't let the garlic cook too long (especially if you are using premade minced garlic since it cooks fast) because it won't taste good and become bitter. {lessons I learned the hard way} 

2. Add 1 1/2 jars of Barilla pasta sauce to meat. I like it really saucy because I feel like it cooks the noodles better that way. But you can adjust the amounts for yourself. 

Save the other half of the sauce for later. 


3. Once the sauce is done, it's time to move on to the cottage cheese mixture layer. I use cottage cheese instead of Ricotta like traditional recipes because it's cheaper and I can't taste a difference... simple. 

Combine the cottage cheese, beaten eggs, pepper, and seasonings in a bowl. Sometimes I add some mozzarella and/or parmesan to the cottage cheese mixture if I'm feeling cheesy that day. 

Let a little helper stir if needed. :) 

4. Now for layering. Pour the other half of the jar of sauce into the bottom of a 9x13 baking pan. I used to use part of the meat sauce I made but then I didn't feel like there was enough for the rest of the layers. So I just use the remaining sauce in the jar now for the first small layer and I think it has worked a lot better. 


Then add the rest of the layers as follows: 
- uncooked Barilla lasagna noodles
- cottage cheese mixture 
- about 1/2" of sauce 
- uncooked Barilla lasagna noodles 
- rest of sauce 
- and top with Mozzarella cheese and Parmesan cheese 


Honestly, I kind of change up the layers sometimes. Sometimes I add a layer of Mozzarella cheese and then just put the Parmesan on top. Again, if I'm feeling cheesy :) 

When you're all done you'll have some pretty layers like this: 


5. Cover baking pan with foil. Bake covered at 350*degrees for 45 minutes. Take foil off and bake for 15 more minutes to get the cheese nice and melty and bubbly. 


6. And lastly, ENJOY!!


If you make this recipe, I would love to hear what you think! Or hear your own variations of lasagna to try out. 

And to help you make your next lasagna meal even more affordable, you can get $1 off the purchase of ONE (1) box of Barilla® Lasagne and ONE (1) Barilla® Sauce at your local Safeway store.  

Happy cooking!

Tuscan Pork Chops


Even though my boys were sick, I give myself a pat on the back for still making dinner. 
And not just dinner, a pretty dinner.
And of course delicious too. :)

So naturally, I'm blogging my accomplishments. 

Since it was seriously so good {and so easy, I wanted to share the recipe. 

Ingredients: 
- 4 boneless pork loin chops 
- pasta of choice (I used a mix of bow tie pasta and penne cause that's what we had) 
- 1 tomato or cherry tomatoes 
- 2 Tbsp. olive oil  
- 1 Tbsp. any flavor vinegar
- 1 tsp. sugar
- 1 tsp. dry basil
- 2 garlic cloves 

Directions: 
1. Season pork chops with salt and pepper. heat 1 teaspoon of the oil in large skillet over medium-high heat. Add pork chops and cook 12 to 15 minutes, turning once, or until no longer pink and meat thermometer reads 160 degrees F. 

2. Meanwhile, cook and drain pasta as directed on package. Pour pasta onto serving platter and arrange chops on pasta. 

3. Stir vinegar into hot skillet. Add remaining oil and remaining ingredients. Cook just enough to heat through. Season to taste with salt and pepper. Pour over chops and pasta. 

Enjoy! 

ice cream sandwich cake


for Adam's birthday {a month ago}, i made this yummmmmy ice cream cake for him. 
i got the idea from a friend and with their permission i'm going to share the recipe with you :) 


Ice Cream Sandwich Cake

ingredients: 
- 1 box of 12 ice cream sandwiches  [we used generic brand and it still tasted great]
- 1 tub of Cool Whip, thawed
- 1 bottle of Hersey's chocolate shell ice cream topping 
- 1/2 bag of Oreos, crushed [i used Double Stuff because i mean... is there really another kind??]

directions:  
1. lay 3 ice cream sandwiches next to each other on your cake plate 
2. pour some chocolate shell topping on top of the ice cream sandwiches 
3. stack 3 more ice cream sandwiches on top, criss-crossing them if desired [i thought they would have a better foundation if criss-crossed]. pour more chocolate shell on top of second layer. 
4. repeat stacking the ice cream sandwiches with chocolate shell in between until you have used all your ice cream sandwiches. you should have 4 layers. 
5. spread the Cool Whip all around the stack of ice cream sandwiches until all covered. if you live in the hot hot heat like us, you will need to move fast as the ice cream might start to melt ;)
6. sprinkle your Oreo crumbs on top and around your cake as you want. i did a lot because i'm an addict. 
7. drizzle more chocolate shell on top of the cake. [before i added the chocolate shell before the Oreos then realize the Oreos weren't sticking as well because the Cool Whip was covered. so i think it would work better to do it last.]
8. place cake in the freezer to harden for at least 10-15 minutes. the longer the more solid it will be and not melty mush. 
9. ENJOY!! 
(10. if you have leftovers, it stays really well in the freezer and is still delicious to eat later!)


i hope you like this simply ice cream cake recipe! 
it's definitely become a favorite in our house. 
Elijah's been asking for it every day for a month, 
now that's a winner! 

Chocolate Lush


i had posted a picture of our leftover Valentine's Day dessert on instagram and had some requests about the recipe. since this is one of my all time favorites, i was happy to spread the chocolate & whipped cream happiness. 
cause it's seriously the best


Chocolate Lush 


Ingredients: 

Crust: 
-1 cube of butter/margarine, softened
-1 cup of flour 
-1 cup of chopped nuts (optional)

Filling: 
-1 package (8 oz.) cream cheese, softened 
-1 cup of sugar 
-1 tub of Cool Whip 
-1 large package of vanilla pudding mix 
-1 large package of chocolate pudding mix

Directions: 

To make crust:
1. combine flour, softened butter/margarine, and nuts until crumbly 
2. Mix well. Press into 9x13 pan. 
3. Bake at 350 degrees for 15 minutes. 
4. Let cool for 30 minutes before adding filling.
  
Next begin the filling.
5. Mix together package of vanilla and chocolate pudding mix. Follow instructions on box to make. Set aside to cool.
6. Mix softened cream cheese and cup of sugar with mixer until smooth. 
7. Once smooth, add in 1/2 of the tub of Cool Whip. Mix well and then spread on crust. 
8. When pudding is ready and cooled, spread over top of cream cheese layer. 
9. Top with remaining Cool Whip. 

i tried to show the layers with this picture but it didn't work very well... ha. 
And of course, ENJOY!
{just like Elijah did :)}


you know it's good when it's Toddler Approved

let me know if you make it!

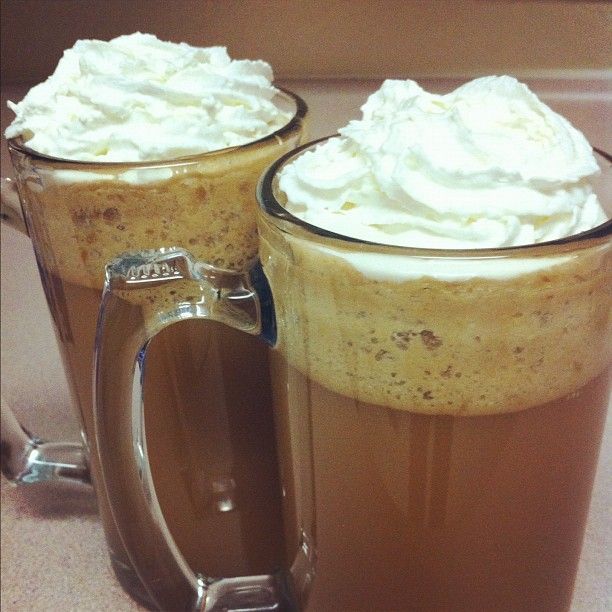
Butterbeer Recipe

Photobucket

it is no secret that me and Adam love Harry Potter
but what was even better than Harry Potter was having amazing neighbors that shared our love for Harry Potter and then some.

when we lived in Utah we had some of the best neighbors.
we loved them,
Elijah was absolutely obsessed with them,
and they were always there for some good, late-night conversation & laughs.

the night before we moved, they came over to visit one last time and brought the most desirable drink in the world:
BUTTERBEER!

it.was.heavenly.
and not to mention the company was extraordinary :)
as a parting gift, they gave us the secret recipe.
quite literally the best gift we could have ever received!
when we made this the other night we both got a little emotional thinking about our last night in Provo with our dear neighbors.
we seriously miss that place sometimes!

with their permission, i am going to share the delicious recipe with you guys!
cause seriously, it will rock.your.world.

ingredients:
- 1 cup brown sugar
-2 Tbs. water
- 2 Tbs. butter
- 1/2 tsp. cider vinegar
- 1 cup heavy whipping cream, divided
- 1/2 tsp. rum extract
- 1/8 tsp. salt
- vanilla cream soda

directions:
1. bring sugar & water to a gentle boil

2. add butter, vinegar, and 1/2 cup of the whipping.
cool to room temperature

3. add salt and rum extract

4. mix 2 Tbs. of mixture with remaining whipping cream and whip until thick

5. with the remaining mixture, cool in the refrigerator*

6. once the mixture is cooled, divide mix into frosty mugs and fill with vanilla cream soda

7. top with whipped topping to serve as head.
{add additional whip cream if desired. i desired :)}

8. enjoy with a Harry Potter marathon!

*this part is pretty important. i didn't let it cool enough the first time and it was too thick & frothy. but once we put our cups back in the freezer/fridge to cool longer it was perfect :)

guys this is so good!!
promise.
it's basically pure sugar so why wouldn't it be wonderful??

if you make it, let me know what you think!

thank you Cyndi & Mark for blessing our lives with not only your life-changing friendship, but also with this life-changing recipe! 
:)